
Places I Visited
This guide provides a complete, step-by-step walkthrough of setting up an V2ray/Xray VLESS server using XHTTP and TLS encryption without the need to setup a reverse proxy like Nginx or Caddy. This configuration allows users to bypass network restrictions and connect securely.
* A server (VPS or cloud instance) running a Linux operating system (Ubuntu 20.04 or later is recommended).
* Basic command-line knowledge.
* An SSH client (like PuTTY for Windows or Terminal for macOS/Linux).
A domain name is essential for issuing TLS certificates. You have two primary options:
Purchase a Domain: This is the most professional and reliable option. Numerous registrars like Cloudflare, Namecheap, GoDaddy, and Google Domains offer affordable domain names.
Use DuckDNS (Free Option): DuckDNS provides free dynamic DNS services. This is ideal for testing or if you don't need a custom domain.
* Sign up for a DuckDNS account at www.duckdns.org
* Create a new domain. Follow the instructions on the DuckDNS website to configure your server to automatically update the DuckDNS record. This usually involves installing a small script.
Let’s Encrypt provides free SSL certificates. We’ll use Certbot (an official Let’s Encrypt client) to obtain and install the certificate.
* A domain name, e.g. "yourdomain.com" with an "A" and optionally an "AAAA" DNS record pointing to your server.
* Certbot package is installed. Visit Certbot Official Website for installation instructions or use package manager of your distribution.
Run the following command to get a certificate for your domain:
* Replace "your@email.com" with your email (you can use gmail or any other email).
* Replace "yourdomain.com" with your domain for which you want to generate a certificate.
| sudo certbot certonly --standalone --agree-tos -m your@email.com -d yourdomain.com |
Note: Xray automatically reloads certificates, so you don't need to do anything when they're renewed by Certbot.
Certificate and private key will be saved into the "/etc/letsencrypt/live/yourdomain.com" directory, where "yourdomain.com" is your domain.
You will need two files:
* "/etc/letsencrypt/live/yourdomain.com/fullchain.pem" is your certificate issued by Let's Encrypt.
* "/etc/letsencrypt/live/yourdomain.com/privkey.pem" is your private key.
The Xray-Install script simplifies the installation process.
* Connect to your server via SSH.
* Run the Xray-Install script:
| sudo bash -c "$(curl -L https://github.com/XTLS/Xray-install/raw/main/install-release.sh)" @ install -u root |
* Wait until installation is done. After the installation, the script will create a configuration file (e.g., "/usr/local/etc/xray/config.json") and start the Xray server.
XRay configuration is located at /etc/xray/config.json. Open it for editing by executing the following command:
sudo nano /usr/local/etc/xray/config.json |
Replace the content with a basic VLESS + XHTTP + TLS configuration:
| { "log": { "loglevel": "warning" }, "inbounds": [ { "port": 443, "protocol": "vless", "settings": { "clients": [ { "id": "4d6e0338-f67a-4187-bca3", // Required, generated with ./xray uuid or a 1-30 character string "email": "your@email.com" //Replace with your email } ], "decryption": "none" }, "streamSettings": { "network": "xhttp", "security": "tls", "tlsSettings": { "certificates": [ { "certificateFile": "/etc/letsencrypt/live/example.com/fullchain.pem", "keyFile": "/etc/letsencrypt/live/example.com/privkey.pem" } ] } } } ], "outbounds": [ { "protocol": "freedom" } ] } |
Remember to replace ID and email with your own information. Save the file and then restart Xray service by executing:
| sudo systemctl restart xray |
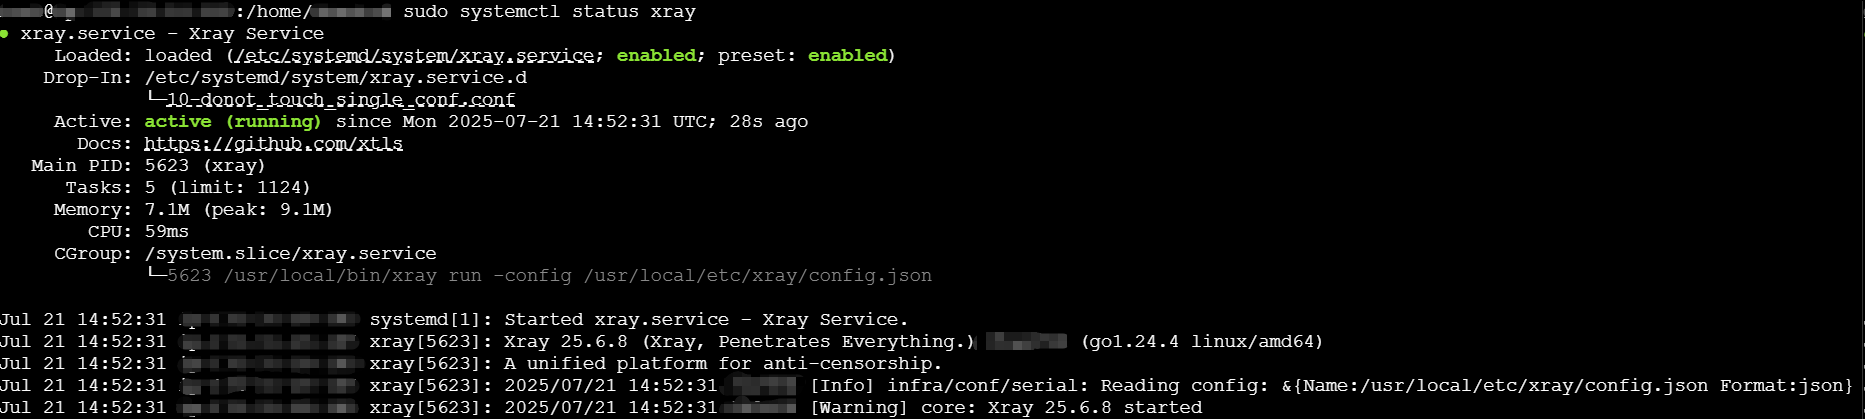
Check if XRay is running:
| sudo systemctl status xray |
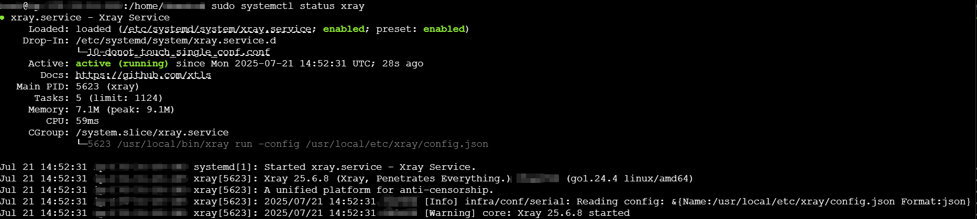
You've now successfully set up an XRay VLESS + XHTTP + TLS on your server. This setup provides a secure and fast proxy service for your needs. Remember to keep your certificates updated and regularly monitor your logs for any issues.